Monthly Archives: May 2014

This Is Far As You Can Go Mr. Context Menu – When PlacementTarget Is Just Not Enough.

Going Up.

Accessing ContextMenus via RightClick is a very common (and expected) paradigm used in Windows desktop apps. WPF provides the ContextMenu element and you normally “attach it” in the XAML through the ContextMenu Property of some visual.

<Image.ContextMenu>
   <ContextMenu ItemsSource="{Binding TileConfigItems}" 
                ItemTemplateSelector="{StaticResource templateSelector}"
                ItemContainerStyle="{StaticResource StretchMenuItem}"/>
</Image.ContextMenu>

A very interesting (and surprising) thing to know about the ContextMenu is that it is essentially a separate “Visual Tree.” This means that if you try to use the RelativeSource syntax in your ContextMenu Binding to traverse upwards to find the DataContext of some Parent visual you will be limited to the ContextMenu itself! What I’m trying to say is that using RelativeSource Mode=AncestorType or AncestorLevel etc … will not be able to access anything other than the visuals within the ContextMenu definition, with the ContextMenu visual being the root.

Nice Place You’ve Got Here.

To solve this problem Microsoft provides the PlacementTarget DependencyProperty to allow you a way to “jump” to the Visual Tree that had invoked the ContextMenu.

In this example a simple context menu is being invoked on a Button within a UserControl. By using the PlacementTarget you can access the Button.DataContext. Without the PlacementTarget you would have no way of getting any farther than the ContextMenu.DataContext.

        
<Button Grid.Row="1" Content="Right Click For Context Menu">
  <Button.ContextMenu>
    <ContextMenu>
      <MenuItem Header="{Binding RelativeSource={RelativeSource Mode=FindAncestor, 
                              AncestorType={x:Type Grid}}, Path=DataContext.ZooName}" />
      <MenuItem Header="{Binding RelativeSource={RelativeSource Mode=FindAncestor,
                              AncestorType={x:Type ContextMenu}},
                                Path=PlacementTarget.DataContext.ZooName}" />
    </ContextMenu>
  </Button.ContextMenu>
</Button>

The Button gets its DataContext from the UserControl. The UserControl has its DataContext set to a ViewModel (ZooVM.cs) which exposes a public string property ZooName. To illustrate how PlacementTarget allows you get to the underlying visual’s tree, I attempt to set the MenuItem.Header to the ZooName property of the Button’s DataContext. As you can see from the screen shot the first MenuItem Binding doesn’t display the ZooName but the second does.

MenuItem1 tries to get to Button.DataContext using AncestorType=Button.

MenuItem1 cannot get to the Button.DataContext.

How come?

The reason the second binding works is because I am employing the PlacementTarget of the ContextMenu, which in this case is the Button. In the first binding I am attempting to traverse to AncestorType = Button. Since the binding starts in the MenuItem the “Max Ancestor” it can get to is the ContextMenu.

OK, Simple Enough. Not!

As the title of this article suggests, using the PlacementTarget won’t help you when you need to get to an “outer” DataContext in a nested situation. (i.e. Grid, ListBox, ListItem)

This diagram below illustrates a typical WPF pattern. The “enclosing” UserControl has a DataContext of ZooVM. When you bind the ItemSource of an ItemsControl to ZoomVm.Cages WPF sets the DataContext to CageVM for the list’s items. Similarly, when you bind an additional ItemsControl to the CageVM.Animals WPF sets the DataContext for each item to an individual Animal.

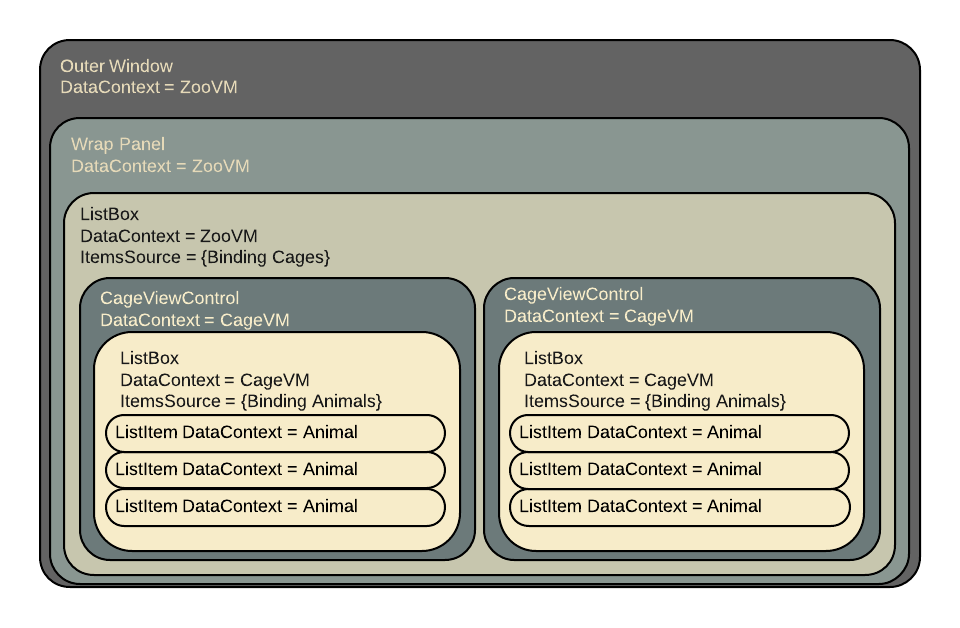
Nested DataContexts – How will you get to the ZooVM when you are stuck in a cage?

As I demonstrated in the previous example, the PlacementTarget allows you to get to the VisualTree that your ContextMenu was nested within. But . . . there is no way using XAML to get the Ancestor of the PlacementTarget. As the nested diagram shows, you can’t reach the ZooVM from a PlacementTarget of Animal.

Tag, you’re it!

I reasoned that I would be able to access the Ancestral DataContext of the PlacementTarget if I could somehow store it in an exposed property. My solution was to use a strategy from my old Win/Office Forms days.

Just like in WinForms, WPF has many elements that support a Tagproperty. You can populate the Tag with pretty much anything. I store the Ancestors DataContext in the Tag property of the “inner ListBox” so I can access it from the ContextMenu’s PlacementTarget.Tag.

The following XAML is from the definition of the DataTemplate for a ListItem in the “innermost ListBox” of the diagram. It’s DataContext is {Animal}. The Label is in the VisualTree of the UserControl, so I can use the RelativeSource AncestorType syntax to access the WrapPanel’s DataContext, which is ZooVM.

<Label Content="{Binding Name}" 
  Tag="{Binding RelativeSource={RelativeSource AncestorType={x:Type WrapPanel}},
  Path=DataContext}">

Now that the desired DataContext has been stored I can access it from the ContextMenu’s PlacementTarget without any problem.

<Label.ContextMenu>
   <ContextMenu >
      ...
      <MenuItem Header="Option 2" 
         Command="{Binding RelativeSource={RelativeSource Mode=FindAncestor, 
            AncestorType={x:Type ContextMenu}}, Path=PlacementTarget.Tag.OuterVMCommand}"
               CommandParameter="{Binding RelativeSource={RelativeSource Self}, Path=Header}" />
   </ContextMenu>
</Label.ContextMenu>

So there you have it!

I have attached a sample app for your enjoyment. 🙂

[download id=”167″]

The Overriding Theme Of It All.

My Style Is Not Being Applied To My Elements!

I was playing around with a third party tool set and applied their theme to my app. This worked great and I was pretty happy with the overall look. As I progressed through my QA I noticed at least one weird byproduct of using themes.

I Said Collapse! (Please?)

The GUI element I call “Super Tiles” allows the user to select/deselect elements that are displayed in a ListBox. I do this by setting the DataTemplate to bind to an IsVisible property on the VM.

        
<DataTemplate x:Key="TotalISPerfWithExpectedCost">
    <UniformGrid Columns="2" HorizontalAlignment="Stretch" Visibility="{Binding IsVisible,
                    Converter={StaticResource boolToVisibility }}" >
    <Label Content="{Binding Label}" HorizontalContentAlignment="Right" />
    <Label Content="{Binding RelativeSource={RelativeSource AncestorType={x:Type ListBox},
                         Mode=FindAncestor}, Path=DataContext.TotalISPerfWithExpectedCost}"
                         ContentStringFormat="{Binding ValueFormatString}" Grid.Column="1"
                         HorizontalContentAlignment="Right" />
        <i:Interaction.Behaviors>
            <behaviors:FrameworkElementDragBehavior/>
        </i:Interaction.Behaviors>
    </UniformGrid>
</DataTemplate>


ThemedNothingHidden

I can see that the vertical spacing between items is already wrong!

After applying the themes, I noticed that the vertical spacing between the “hidden” ListBoxItems was not being fully collapsed. Ugh!

Themed2ThingsHidden

See the weird space between the 4th and 5th Item?

 Even though I explicitly set the ListBox.ItemContainer.Style to have 0 margin etc , etc, the weird behavior persisted. To debug the issue I set the highlighting on the selected item to an extreme (and ugly Olive Drab) color. Sure enough, when running the app and selecting an item, the highlight would not render as expected. This was a hint that my explicitly set style was being overridden.

So that’s how it works.

Obviously this had to have something to do with the recently applied theme. Previously everything was working as expected, but now I seemed to have no control over the styles.

Here is the issue. When you set a theme, all the effected controls get their BasedOn properties set to the current theme’s resource dictionary. So what this means is that your explicitly set styles using TargetType etc. won’t do anything because you are not instructing WPF to override/change the theme’s  settings.

If the current theme is unchanged, the default BasedOn is also unchanged.

Solution

In order to inform WPF that I wanted to circumvent the theme’s definitions I needed to explicitly define a Style BasedOn the Static Definition of the ListboxItem.

First – Set up a Style in the Resources of your control and ref the Static x:Type of the desired element.

<Style x:Key="DataPointListItemStyle" TargetType="ListBoxItem" 
          BasedOn="{StaticResource {x:Type ListBoxItem}}">
   <Style.Resources>
     <SolidColorBrush x:Key="{x:Static SystemColors.HighlightBrushKey}" 
                         Color="LightBlue"  Opacity=".5"/>
   </Style.Resources>
</Style>

Second – implement the Style in your element

<ListBox.ItemContainerStyle>
   <Style TargetType="ListBoxItem" BasedOn="{StaticResource DataPointListItemStyle}" />
</ListBox.ItemContainerStyle>

Check it out!

StyledNothingHidden

Smaller spacing vertically between items

Styled2ThingsHidden

“Hidden” elements are now fully collapsed! (avoiding the themed ListBoxItem definitions)

Cool! 🙂

I Can’t Hear You.

I can see and hear my friend on Skype but he can only see me.

I tried to set up Skype with my friend last night so we could use the video conferencing feature and review a project we are collaborating on.

Well. . . it took us a while to figure out why I could hear him but he could not hear me. Our first guess was that it was some config/setting on his iPad. Nothing seemed to work so my friend tried the Skype test call. Confusingly, the test call worked perfectly and he could hear the test tones.

Undeterred I searched the interwebs and got nowhere.

What could possibly be wrong?

The only thing that seemed to be common to the complaints I saw was that users had recently upgraded to iOS 7.  My friend had not upgraded (he is afraid) but I had!

I proceeded to check my iPad settings and first looked at Sounds. I also checked the Skype node and the General. Nowhere was there any hint as to why he couldn’t hear me.

Ah Ha!

Eventually, I ended up checking every node in settings and found something promising in Privacy.

Microphone!

So look, I’m not going to pass judgment or anything here but I really don’t see how placing microphone settings in Privacy makes a lot of sense.

Sure enough, when I expanded the microphone submenu there was one item and it had the name Skype next to it. The slider was set off, so I turned it on, basically giving Skype access to the Mic.

Not sure how I feel about this exercise but I’m glad its over.

Here is hoping  that this helps someone else.

Bah!


Genymotion – the way to go

I downloaded the XamarinStore app (cause I want the T-Shirt)  and was bummed out with the way the app looked in the v14 Android emulator. (I couldn’t see the all the text so I couldn’t tell what was needed to complete the next steps.)

Luckily, Nick at Xamarin mentioned that I should check out GenyMotion and get the free android emulators from them.

Wow, big difference! And much better!